Sunday, April 17, 2011

Friday, April 15, 2011

My favorite salad


The dressing I use for this salad has been used in my family for many generations. The seasoning in the above picture is what gives it its unique taste. I can't remember ever finding this particular seasoning at the local grocery store, usually it is given to me from one of the matriarchs of the family or I have found it at German specialty stores. If you don't feel like going hunting and would like to replicate this particular salad I would substitute it with the standard Italian dressing packets you can find at any grocery store.


This should be a fast, do it by your taste kind of recipe. I grab a glass measuring cup fill it with a cup or less of water, crumble about a quarter of a beef bouillon cube into the water, throw it in the microwave to warm it up so it dissolves, then I add vinegar generously about a cup, chop up 2 or 3 green onions and add them in along with some cracked pepper and oil, stir it up real good with a fork and set aside. Move on to the veggies; chop up the cucumber first so you can get it soaking in the dressing while you are chopping the rest of the veggies. Chop carrots thinly, tomato wedges, and your greens. I usually pick dark greens, I think they go the best and if I have spinach in the fridge I will mix some in too. Chill or eat right away. I usually save the leftover dressing and use it the next day or leave chopped cucumber soaking in the dressing for a pickled snack the next few days. This is a very salty and vinegary salad.

Tuesday, April 5, 2011

Homemade Pita


Ok so I have been hoarding pictures for weeks now and I'm finally getting around to posting them. Last week I wanted to have something greek-ish for dinner so I made homemade pita bread. It was super simple and delicious. I have made this recipe before and it is tried and true:
 1 c. warm water
3 c. AP flour
2 t. salt
1 T. Oil (Olive or Vegetable)
1.5 t. sugar
1.5 t. Dry Active Yeast

The method is also very simple. Measure out all of your ingredients. Combine water, oil, yeast, sugar and salt in one bowl. Lets stand for 8 minutes. Mix flour into the liquid mixture and turn out onto a floured surface. Knead into a ball, pictured above, cut into portions, 6 to 8 smaller balls. Roll dough out into circles and cover with a damp towel, or plastic wrap for about 30 to 45 minutes. Preheat oven to 500. Once the dough has risen a little remove the towel, lightly brush with olive oil, season with salt and pepper and place the circles of dough in the oven, on a sheet tray, or directly on the rack. Bake for six to ten minutes until the pita has puffed up and is starting to brown.
Remove from oven and allow to cool, cut in half, split pita down the center and enjoy

Saturday, April 2, 2011

Cooking Dinner at The Bellagio

Canapes: Giant Clam Sashimi, White Soy, Wasabi, Micro Shiso; Foie Gras Mousse, Candied Kumquat, Anise Hyssop; French Breakfast Radish, Green Olive Butter, Grey Salt


First Course: Vanilla Butter Poached Lobster, Sun Choke Puree, Sunflower Sprouts, Argon Oil and Espellette

Second Course: Oak Smoked Squab, Roasted Beets, Black Trumpet Mushrooms, Micro Fennel and Pickled Strawberries

Third Course: Beef Composition; Grilled Ribeye, Braised Short Rib and Crispy Tendon, With Roasted Carrots, and Pea Tendrils

Cheese Course/ Dessert: Oregon Blue Cheese Mousse, Pistachio (Puree, Pesto and Financier), Sous Vide Rhubarb, Crumbled Hyssop Blossom

Leftover Mexican Breakfast

Just a little huevos rancheros to start our morning off right

Nob Hill Randoms

Crispy Veal Sweetbreads with Frisee, Fine Herbs, Radish and Sauce Gribiche.. Super timeless

Spring menu grilled asparagus salad with smoke parma ham.. Delicious

Burgundian Snails, Milk Poached White Asparagus, Garlic, Dijon and Watercress

Sunday, February 13, 2011

BAKED APPLES WITH ICE CREAM

Yum.

Wednesday, February 9, 2011

Let's learn about fregola

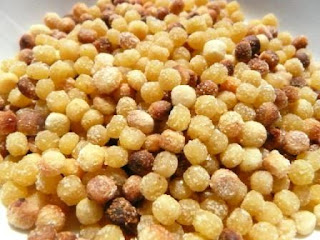
Fregola is a pasta that is said to have originated in Sardinia. Some call it Sardininan cous cous because it is very similar to its counterpart Israeli cous cous. It is made with semolina flour that is rolled into little balls and then toasted. The toasting is unique to this type of pasta and isn't found elsewhere. It is the toasting process that really sets this pasta apart, adding a depth of flavor, aroma and earthiness that is truly amazing.
Fregola is found in specialty markets and on-line. It isn't very common in the US but it is gaining popularity especially in authentic Italian kitchens. It is traditionally served with a shellfish and tomato stew of sorts but is also a great vessel for any flavor you might like to add. It is great in salads and as a side dish.
It is cooked just like any other pasta, blanched in simmering water until al dente. You can also cook it like cous cous where you pour boiling water over it and let it steep until tender. It is very versatile and a lot of fun to work with and it is one of my all time favorite pastas from this region. Expect to see more of this pasta in the near future!

http://gastroplod.wordpress.com/2008/07/18/fregola-sarda-seafood-bottarga/
To buy;
http://www.cybercucina.com/ccdocs/products/RA4070FR.html?source=GoogleDataFeed&ccag=Pastas

Wood Grilled Australian Prawns, Fregola Pasta, Shellfish Brodo, Crispy Basil


At work we recently tried out these prawns from Australia. Wow, they were so delicious and just full of intense oceanic flavor. They taste like the ocean with a hint of sweetness, and after being grilled over a wood fire the smokiness compliments them so well! In addition to these new prawns I used one of my favorite dry pasta products on this dish.. Fregola{FREH-Gohla} More on this later, My wife just made biscuits and gravy sooo mangiamo y hanno buon giorno!

Friday, February 4, 2011

Osso Bucco


 Osso Bucco with Creamy Polenta, Roasted Miataki Mushroom and Slow Cooked Tomato Vinaigrette

Thursday, February 3, 2011

Chicken and Dumplings

I love this recipe, I have been making a version of this since I was a sophmore in high school.  This is one of the first meals I really enjoyed making.  Reminds me of my grandma :)


The Dumplings:
2 cups of flour
2 teaspoons of baking powder
1 teaspoon of salt
1/2 cup of buttermilk or milk
1/3 to 1/2 cup of butter or shortening

The Soup:
1 whole chicken
4 carrots
1/2 onion
3 stalks of celery
1 clove of garlic
2 bay leaves
1 teaspoon of sage (optional)
1/4 cup of parsley (optional)
4 to 6 chicken bullion cubes
water enough to fill the pot
chicken broth left over from boiling the chicken


In a large stock pot boil whole chicken until there is no pink left. Remove chicken from pot. Strain the water the chicken was boiling in and return to stock pot. Cut up carrots, celery, parsley, onion and garlic add to the broth in the stock pot. Add sage, bay leaves and salt & pepper to taste. Return stock pot to stove heat on low to medium heat. Remove all meat from the bones, roughly chop or shred the bone free chicken and add the meat to the broth and veggies. Add enough water to fill the vessel you are cooking in, then add chicken broth bullion cubes to taste, probably 4 depending on the vessel and whether or not you use the broth the chicken was cooking in, if you do not use a whole chicken and broth from cooking a whole chicken you will likely need more chicken bullion cubes for flavor. Cook until carrots are soft enough to eat.

Meanwhile mix together flour, baking powder, salt in a medium to small mixing bowl. thoroughly cut in butter or shortening. Then add milk and mix. After ingredients are combined kneed it a couple of times into a big ball of dough. About ten minutes before you are ready to serve add in the dumplings. Pinch small bits of dough and gently press into small lil balls about the size of malt balls, quarter size, try not to over work it. then toss em into the soup at a medium boil. Make sure there is enough liquid to support the dough, you don't want them to be too crowded. Occasional stir the soup while you are adding in dumpling to make sure they are all cooking and not sticking together. let the dumplings cook for about 8 minutes. Serve it up!


Sunday, January 30, 2011

Butternut Squash and Sourdough Bread Salad, Shells and "Cheese", Roasted Beef Tenderloin


This ones kind of fun.. So last week we wanted to have something a little more healthy for dinner. Little Ryder loves macaroni and cheese so I thought why not make shells and cheese with no cheese? I Roasted half of a butternut squash, the other half I used for the dice in the salad, and then I pureed it. I have used squash puree in several applications but I had never used it as a pasta sauce alone. After roasting it, I scraped out the flesh with a spoon and blended it with a little almond milk. While it was blending I emulsified in some olive oil to create a nice flavor and smooth texture. It turned out a little thick so I reserved a little of the pasta water and thinned it out. I glazed the pasta and viola.. shells and "cheese".
I used the rest of the squash by simply dicing it and sauteing it in a little brown butter. I made sourdough croutons with some leftover bread from work. Made a litlle maple viniagrette and tossed it all with some arugula. I topped t all of with a piece of pan roasted beef tenderloin trim. All together it was very cost effective and low fat dinner that was "so derricious" as Ryder would say.

Cinnamon Rolls


Below is the original recipe.  The recipe can easily be cut in half or you can make the whole recipe and freeze half for another day because it makes 24 cinnamon rolls and I can never eat more than one.  This recipe is quick and easy and perfect for making the night before.  If you are making them the night before keep them in the fridge until morning, then take them out when you first wake up, set them in a warm spot, or turn on the oven and place them on top of the stove for a couple of hours so they can warm up and rise before you bake them.  I do this and sometimes still have to open the door of the oven and let them sit on the oven door with the oven on a low temperature.  Once you have slept in a couple of hours and the rolls have enlarged to about double in size throw em in the oven for 20 to 25 minutes and enjoy.  

Additions:
After i spread the butter, brown sugar, cinnamon mixture I added a thin layer of chopped pecans and golden raisins before I rolled them up.

Cinnamon Rolls II
Submitted By: PAT MYERS
Prep Time: 30 Minutes
Cook Time: 25 Minutes Ready In: 1 Hour 55 Minutes
Servings: 24

Ingredients:
1 cup milk
1/2 cup butter
1 cup water
1 tablespoon active dry yeast
1 cup white sugar
1 teaspoon salt
2 eggs
6 cups all-purpose flour

2 teaspoons ground cinnamon
2 cups dark brown sugar
1/2 cup butter, softened

2 cups confectioners' sugar
1 (8 ounce) package cream cheese, softened
1 tablespoon butter, softened
1/2 teaspoon vanilla extract
3 tablespoons milk

Directions:
1. Warm the milk in a small saucepan until it bubbles, then remove from heat. Mix in the butter; stir until melted. Add water and let cool until lukewarm.
2. In a large bowl, combine the milk mixture, yeast, white sugar, salt, eggs and 2 cups flour; stir well to combine. Stir in the remaining flour, 1/2 cup at a time, beating well after each addition. When the dough has pulled together, turn it out onto a lightly floured surface and knead until smooth and elastic, about 8 minutes.
3. Divide dough into two pieces. Roll each piece into a 12x9 inch rectangle. In a bowl, stir together the cinnamon and brown sugar. Spread each piece with half of the butter, half of the brown sugar and cinnamon mixture. Roll up dough, using a little water to seal the seam.
4. Cut each roll into 12 slices using a very sharp knife or dental floss. Place rolls onto two 9x13 inch greased baking pans. Cover and let rise until almost doubled, about 1 hour. Meanwhile, preheat oven to 375 degrees F (190 degrees C).
5. Bake in preheated oven for 20 to 25 minutes until golden brown.
6. To make frosting; combine confectioner's sugar, cream cheese, butter and vanilla. Add milk gradually until frosting reaches a spreading consistency. Spread over warm (but not hot) cinnamon rolls.
ALL RIGHTS RESERVED © 2011 Allrecipes.com Printed from Allrecipes.com 1/30/2011


Thursday, January 20, 2011

Chicken African Stew

The first time I made this was for an African party that I was co-hosting at my home.  It was sort of a Peace Corp reunion, everyone brought food and the evening was wonderfully filled with culture and conversation.  Everyone loved my dish, maybe even the most, we should have had a contest!  Next time...
This may not be much to look at but it is one of my favorite things to eat.  I found the original recipe at allrecipes.com, I usually add 3 carrots, 2 to 3 sweet potatoes or Idaho potatoes depending on the size, I use chicken broth instead of water and quite a bit more than 1 cup depending on how many vegetables I am adding, then later if it is necessary I will add some water, I sometimes double the spices and add in different varieties of crushed pepper if I have it around because I like it extra spicy, i try to avoid frying anything with olive oil even at low temperatures so i use vegetable oil instead or i use chicken fat leftover from baking the whole bird, but to save myself time and energy I usually buy a whole rotisserie already prepared.  I serve this with brown rice or ugali.  When you serve it with rice and add in the veggies you can feed twice as many people.

African Chicken Stew

Prep Time: 10 Minutes Ready In: 45 Minutes
Submitted By: Leah Shaw Cook Time: 35 Minutes Servings: 6
"Inspired by authentic West African cooking, this delicious stew combines vegetables and peanut butter with a little heat from a medley of spices. Alter the recipe to suit your preferences--it lends itself beautifully to improvisation."

Ingredients:
1 tablespoon olive oil
1 (3 pound) roasting chicken, deboned
and cut into bite size pieces
2 cloves garlic, crushed
1 onion, chopped
1 large potato, diced
1 teaspoon ground cumin
1 teaspoon ground coriander seed 1 teaspoon ground black pepper
1 teaspoon crushed red pepper flakes
1 teaspoon salt
1 cup water
3/4 cup unsalted natural-style peanut butter
1 (15 ounce) can garbanzo beans,drained and rinsed

Directions:

1. In a large skillet with a tight-fitting lid, heat oil over medium high heat. Add chicken, and brown quickly. Remove chicken from pan. Reduce heat to medium low, and add garlic, onion and potato to the pan; saute for 2 to 3 minutes. Season with cumin, coriander, black pepper, red pepper and salt. Do not let garlic brown.

2. Mix in water and browned chicken, and any accumulated juices. Place lid on skillet and simmer, stirring occasionally, for 10 to 15 minutes.

3. Remove lid, and stir in the peanut butter and garbanzo beans. Make sure the peanut butter is blended in. Replace lid to simmer for 10 more minutes, or until chicken is cooked through and potatoes are tender. Remove from heat, adjust seasoning, and serve.

ALL RIGHTS RESERVED © 2011 Allrecipes.com Printed from Allrecipes.com 1/20/2011

Sunday, January 16, 2011

Maple custard filled doughnuts recipe from Nancy Silverton's Pastries from the La Brea Bakery


 It was a long and very busy Saturday night at work. As one might imagine I was on my way home dreaming of a hot shower, cold beer, maybe a back rub, some time to read? I arrived at our house, and upon opening the door the smell of yeast and spices filled the air. I peeked into the kitchen to see my loving wife awaiting my arrival. Baggy sweat pants, over sized t-shirt and disheveled hair, she was coddling the metal bowl from the kitchen aid mixer. It was wrapped in warm towels and she looked up and gave me that "Oh you're about to help me make doughnuts" grin. I've seen that look before but never in this exact way. Followed immediately by the "please don't make me do this alone" pouty face. At this point I would say she is crazy, but I know she has walked in on me doing something similar on many occasion.
I walked in and assessed the situation. It was 12:45 am Sunday morning and the dough was still on it second rising. We had to speed this up a bit because I was absolutely exhausted, so I turned on the oven and we popped the dough into it as sort of a makeshift proofing box. After the dough had double in size we turned it out onto a board, kneaded it lightly and returned it to the bowl for another half hour. Quickly I jumped in the shower, recognizing this as my small window to take care of my business before bed. I finished up and went back into the kitchen where she stood anxiously awaiting this second rising. It was spiritual in a sense. The anticipation of the finished product, as well as just finishing the project, filled both of our minds. 
We rolled the dough and cut it out, and then of course had to let it rise for another fifteen to twenty minutes... Smoke break, glass of wine, maybe some sex? Fifteen minutes leaves time for some things but certainly not all three. 
After the cut doughnuts had risen and we had the oil to a seemingly appropriate temperature we began to fry. She fried and I filled them with custard for the next half hour. They were finally done and so were we. They turned out so delicious but you could hardly enjoy this momentous occasion at four in the morning, barely awake. Bedtime at last. 
We woke up Sunday morning, hell yeah for days off, and I cleaned up a bit. I will never forget the moment I looked over at Monica with her cup of hot tea and the freshly made doughnut. She had a look of triumph and bliss on her face. She smiled at me and laughed. We ate doughnuts, drank coffee and had the most amazing day, due largely in part to such an awesome start. 
Jelly Doughnuts

Special Items:  2-inch round cutter, heavy-duty deep saucepan filled half way with vegetable oil, pastry bag fitted with a #1 or #2 plain tip

1 Tablespoon (0.6 ounces) packed fresh yeast or 2 1/4 teaspoons active dry yeast
1/2 cup plus 1 tablespoon buttermilk
1/4 cup plus 1 tablespoon dry milk powder
2 1/4 cups plus 1 tablespoon unbleached pastry flour or unbleached all-purpose flour
1/4 cup plus 2 tablespoons granulated sugar
1 teaspoon kosher salt
1/2 stick plus 1 tablespoon (2 1/2 ounces) unsalted butter, room temperature
2 teaspoons freshly grated nutmeg
3/4 teaspoons ground cinnamon
7 extra-large egg yolks
For decorating:  Granulated sugar or nonmelting icing sugar or powdered sugar

Place yeast in the bowl of an electric mixer and pour 1/2 cup of the buttermilk over it.  Add the milk powder and 1 cup of the four and allow the yeast to soften for about 2 to 3 minutes without stirring.  Using the paddle attachment, mix on low for 30 seconds, then turn up to medium-high and mix until the dough is smooth, shiny, and very sticky, about 1 to 2 minutes.

Sift an even layer of flour onto the work surface.  Scrape the dough out of the bowl onto the surface.  Clean the mixing bowl and lightly coat it with vegetable oil.  Gather the dough and return it to oiled bowl.  Cover it tightly with plastic wrap, and set aside in a warm place until dough has doubled in size, about 1 to 1 1/2 hours.

Add the remaining buttermilk, 1 cup plus 3 tablespoons of the flour, the sugar, salt, butter, nutmeg, cinnamon, and 4 of the egg yolks to the dough and mix on low just to combine.  Turn the mixer up to medium and continue mixing until incorporated and the dough is shiny, about 1 to 2 minutes.  Turn the mixer off and add the remaining flour.  Add the remaining egg yolks one at a time, mix on low for half a minute, until incorporated.  Turn the mixer up to high and mix for 1 more minute. The dough will be very sticky.

Sift an even layer of flour onto a surface.  Scrape the dough out of the bowl onto the surface and sift another layer of flour over the dough.  Clean the mixing bowl and lightly coat it with vegetable oil.  Gather dough together and return it to the oiled bowl.  Cover the bowl tightly with plastic wrap and set aside in a warm place until the dough has doubled in size, about 1 1/2 hours.

Turn dough out onto a lightly floured surface and gently roll or pat the dough into a rectangle just under 1/2 inch thick, flouring the surface of the dough as necessary.  Dip the cutter in flour and, cutting as closely together as possible, cut out the doughnuts.  Place them on a floured surface to rest 15 minutes before frying.

Fry doughnuts in oil that is 375 degrees.  Depending on the frying vessel and range this could be anywhere from low to med-high.  This part is a lil tricky but it helps if you have a thermometer.  Fry for a couple of minutes on each side, one side and then the next.  More information on frying per request.

Allow the doughnuts to cool slightly.  On a work surface or baking sheet, turn them upside down and, using a sharp knife (we used a wooden skewer), prick the bottoms (we pricked the sides) in the center of each doughnut.  Fill the pastry bag with filling, place the pastry tip about 1/2 inch into the hole, and squeeze about 1 teaspoon of filling into each doughnut.  Turn them right side up and roll the tops in granulated sugar or sift with nonmelting icing sugar or powdered sugar.

Yield:  18 doughnuts
Recipe from:  Nancy Silverton's Pasteries from the La Brea Bakery

Thursday, January 13, 2011

Banana Bread.

Tonight I made banana bread.  No big deal I make this so often I feel like I could make it in my sleep.  The recipe that I use I found on allrecipes.com.  I like it because it is super simple and you can use it to make a variety of sweet breads.  I usually have a fridge full of fruit and it does not always get eaten before it loses its freshness.  Sometimes we add our imperfect fruit to oatmeal and have it for breakfast but by far my favorite thing to do is make sweet breads.  Below is the original recipe, I usually add 1 tsp. of cinnamon, 1/2 tsp. of vanilla, a little bit of nutmeg and clove if you have it around.  You can replace the bananas with other fruit you have around like ripe peaches or apples. And you can always add nuts.

INGREDIENTS:
2 cups all-purpose flour
1 teaspoon baking soda
1/4 teaspoon salt
1/2 cup butter
3/4 cup brown sugar
2 eggs, beaten
2 1/3 cups mashed overripe bananas

DIRECTIONS:
1. Preheat oven to 350 degrees F (175 degrees C). Lightly grease a 9x5 inch loaf pan.

2. In a large bowl, combine flour, baking soda and salt. In a separate bowl, cream together butter and brown sugar. Stir in eggs and mashed bananas until well blended. Stir banana mixture into flour mixture; stir just to moisten. Pour batter into prepared loaf pan.

3. Bake in preheated oven for 60 to 65 minutes, until a toothpick inserted into center of the

Tuesday, January 11, 2011

Lets Learn About Celery Root

Monica found this very informative article;  http://www.npr.org/templates/story/story.php?storyId=6551175

Celeriac is one of my favorite winter vegetables. It is versatile, flavorful and also very healthy. It can be a little intimidating if you have never worked with it before, but practice and patience will yield a very beneficial addition to your vegetable repertoire.

Typically you would peel the root with a knife rather than a peeler. I find it best to cut off each end so it will sit on a flat surface while you trim off the sides. Discard all of the peeling and rinse the root in cold water. From here your options are limitless. You can blanch it lightly and use it in a salad or cold application. You can cut it into perfect dice and cook it with a vegetable soup.

My absolute favorite way to use it is to puree it. I cut the root into a rough dice of sorts and then cook it in lightly salted water until tender. At this point I would remove it from the liquid and put it into a blender. You may also mash it with a fork but your end product will obviously not be a smooth. Once in a blender I would puree it, using as little liquid as possible to get it to spin. At this point you could add butter to create a very rich and silky puree. This is completely unnecessary, but in most cases I would say butter makes better. Season it with salt and white pepper, maybe a little acidity like champagne vinegar or lemon juice, and there you have it. A really nice pureed vegetable that can be used as a sauce on a plate, folded into other starches like potatoes for flavor and body, or a stand alone side of whipped celery root.

In addition you could take your puree and thin it with a little water and turn it into a looser, milk or cream like substitute. This can be very beneficial in making vegan or vegetarian soups or sauces. I haven't yet but I will do a little more homework and try and use this cream substitute in other applications as well.

As I said in the very beginning your option are limitless so if you find something works well, go with it, and share it with us.

Pan seared Foie Gras with caramelized almond cake, blond apple butter, currant demi, and salted struesel

Nick's creation at Knob Hill Tavern.

Pan roasted ribeye cap, celery root mashed with roasted garlic and pomegranat vinaigrette

Sunday, January 9, 2011

Let's break bread.

Food, food and more food. Food has been apart of each of our lives for a long time...it's what we do and do well. Eating is a ritual, a favorite pastime, and a way of life. Sharing food with friends and family is a tradition that I take with me everywhere I go. I hope to see each and everyone of you at our dinner table, until then we will continue to tempt you with tantalizing dishes daily! Comments, questions, and suggestions are welcome.